
之前在centos7上编译安装过mysql8,这次记录下在ubuntu22.04上编译安装的过程,编译软件版要求和约束路径都和centos一样,可以查看之前的笔记:https://sulao.cn/post/775
安装包存放/usr/local/src下,编译安装到/usr/local/对应软件目录下,例如mysql就是/usr/local/mysql目录下
/data/mysql目录是mysql数据存放目录,我全程是root账户编译的,自行sudo进行切换到root账户,mysql运行账户使用的mysql
apt update
apt install build-essential cmake pkg-config libncurses5-dev libssl-dev libaio-dev libreadline-dev libtirpc-dev -y
下载mysql-boost-8.0.42.tar.gz编译源码包
wget https://dev.mysql.com/get/Downloads/MySQL-8.0/mysql-boost-8.0.42.tar.gz
tar -zxvf mysql-boost-8.0.42.tar.gz
添加管理mysql服务账户
groupadd mysql
useradd -g mysql mysql -s /sbin/nologin
创建mysql数据存储目录
mkdir -p /data/mysql创建编译目录
mkdir -p /usr/local/mysql进入源码目录,开始编译
cd mysql-8.0.42
cmake -DCMAKE_INSTALL_PREFIX=/usr/local/mysql -DMYSQL_DATADIR=/data/mysql/ -DDOWNLOAD_BOOST=1 -DWITH_BOOST=boost -DFORCE_INSOURCE_BUILD=1 -DENABLE_DOWNLOADS=1 -DCMAKE_C_COMPILER=/usr/bin/gcc -DCMAKE_CXX_COMPILER=/usr/bin/g++ -DWITH_SLL=system
make -j$(nproc)make install
配置mysql配置使用my.cnf文件
vi /etc/my.cnf然后添加以下配置:
[client]
port = 3306
socket = /data/mysql/mysql.sock
default-character-set = utf8mb4
[mysqld]
port = 3306
socket = /data/mysql/mysql.sock
basedir = /usr/local/mysql
datadir = /data/mysql
pid-file = /data/mysql/mysql.pid
server-id = 1
init-connect = 'SET NAMES utf8mb4'
character-set-server = utf8mb4
#skip_name_resolve
#skip-networking
back_log = 300
max_connections = 2000
max_connect_errors = 6000
open_files_limit = 65535
table_open_cache = 128
max_allowed_packet = 500M
binlog_cache_size = 1M
max_heap_table_size = 8M
tmp_table_size = 16M
read_buffer_size = 2M
read_rnd_buffer_size = 8M
sort_buffer_size = 8M
join_buffer_size = 8M
key_buffer_size = 4M
thread_cache_size = 8
ft_min_word_len = 4
log_bin = mysql-bin
binlog_format = mixed
expire_logs_days = 7
binlog_expire_logs_seconds = 604800
log_error = /data/mysql/mysql-error.log
slow_query_log = 1
long_query_time = 1
slow_query_log_file = /data/mysql/mysql-slow.log
general_log = 1
general_log_file = /data/log/mysql/mysql.log
performance_schema = 0
#lower_case_table_names = 1
skip-external-locking
default_storage_engine = InnoDB
innodb_file_per_table = 1
innodb_open_files = 500
innodb_buffer_pool_size = 64M
innodb_write_io_threads = 4
innodb_read_io_threads = 4
innodb_thread_concurrency = 0
innodb_purge_threads = 1
innodb_flush_log_at_trx_commit = 2
innodb_log_buffer_size = 2M
innodb_log_file_size = 32M
innodb_log_files_in_group = 3
innodb_max_dirty_pages_pct = 90
innodb_lock_wait_timeout = 120
bulk_insert_buffer_size = 8M
interactive_timeout = 28800
wait_timeout = 28800
[mysqldump]
quick
max_allowed_packet = 500M
[myisamchk]
key_buffer_size = 8M
sort_buffer_size = 8M
read_buffer = 4M
write_buffer = 4M
指定数据目录和运行目录并初始化mysql8
/usr/local/mysql/bin/mysqld --initialize --basedir=/usr/local/mysql --datadir=/data/mysql这个步骤会产生一个mysql密码,我们需要将它记录下来
cat /data/mysql/mysql-error.log
重新赋权mysql存储目录
chown -R mysql:mysql /data/mysql最后我们可以编写一个mysql的服务,方便我们使用systemctl控制它
cp ./support-files/mysql.server /usr/local/mysql/bin/mysql.server
vi /usr/local/mysql/bin/mysql.server
basedir = /usr/local/mysql #MySQL程序安装路径
datadir = /data/mysql #MySQl数据库存放目录
给服务脚本执行权限
chmod +x /usr/local/mysql/bin/mysql.server编译mysql管理服务配置文件
vi /usr/lib/systemd/system/mysqld.service
[Unit]
Description=mysql project
After=mysqld.service

[Service]
Type=forking
User=mysql
Group=mysql
PIDFile=/data/mysql/mysql.pid
ExecStart=/usr/local/mysql/bin/mysql.server start
ExecReload=/usr/local/mysql/bin/mysql.server restart
ExecStop=/usr/local/mysql/bin/mysql.server stop
PrivateTmp=true

[Install]
WantedBy=multi-user.target
给管理服务配置脚本754权限
chmod 754 /usr/lib/systemd/system/mysqld.service
systemctl daemon-reload
systemctl start mysqld.service #启动mysql
systemctl enable mysqld.service #添加到开机启动
将mysql服务加入系统环境变量,在最后添加下面这一行
vi /etc/profile
export PATH=$PATH:/usr/local/mysql/bin
退出编辑,使其生效
source /etc/profile登录修改默认密码,使用刚才mysql-error.log中记录的密码
mysql -u root -p
alter user "root"@"localhost" identified by "新密码";
授权用户远程访问
use mysql;
update user set host='%' where user ='root';
最后刷新权限
flush privileges;最后我们再次确认下host是"%"说明可以远程登录了。
use mysql;
select host, user, authentication_string, plugin from user;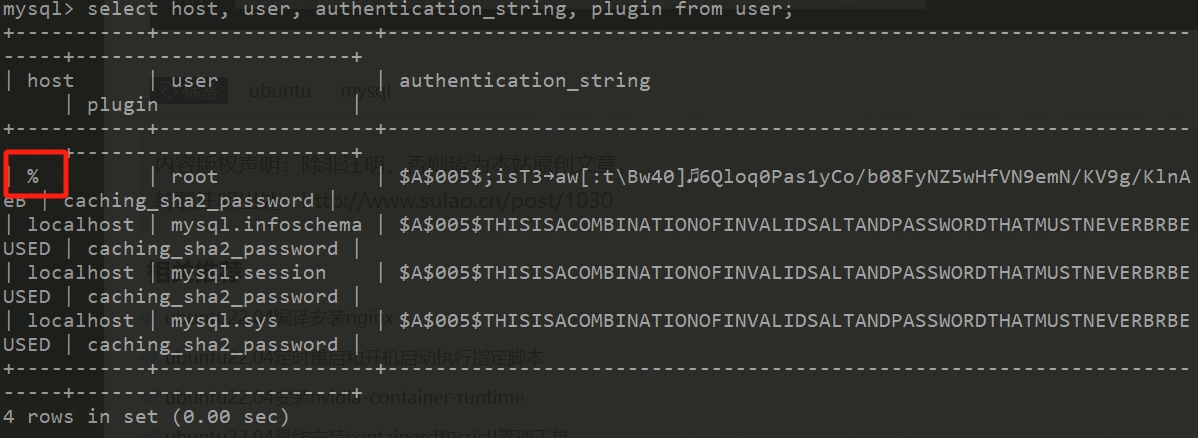
如果是生产环境,建议做安全启动配置向导,在安装完mysql以后,直接执行
mysql_secure_installation
NOTE: RUNNING ALL PARTS OF THIS SCRIPT IS RECOMMENDED FOR ALL MySQL
SERVERS IN PRODUCTION USE! PLEASE READ EACH STEP CAREFULLY!
In order to log into MySQL to secure it, we'll need the current
password for the root user. If you've just installed MySQL, and
you haven't set the root password yet, the password will be blank,
so you should just press enter here.

Enter current password for root (enter for none): <–-初次运行直接回车
OK, successfully used password, moving on…
Setting the root password ensures that nobody can log into the MySQL
root user without the proper authorisation.

Set root password? [Y/n]    //是否设置root用户密码,输入Y并回车或直接回车

New password:               //设置root用户的密码

Re-enter new password:      //再次输入你设置的密码
Password updated successfully!
Reloading privilege tables..
… Success!

By default, a MySQL installation has an anonymous user, allowing anyone
to log into MySQL without having to have a user account created for
them. This is intended only for testing, and to make the installation
go a bit smoother. You should remove them before moving into a
production environment.
Remove anonymous users? [Y/n]   //是否删除匿名用户,生产环境建议删除,所以直接回车
… Success!

Normally, root should only be allowed to connect from 'localhost'. This
ensures that someone cannot guess at the root password from the network.
Disallow root login remotely? [Y/n] //是否禁止root远程登录,根据自己的需求选择Y/n并回车,建议禁止
… Success!

By default, MySQL comes with a database named 'test' that anyone can
access. This is also intended only for testing, and should be removed
before moving into a production environment.
Remove test database and access to it? [Y/n] //是否删除test数据库,直接回车
- Dropping test database…
… Success!
- Removing privileges on test database…
… Success!

Reloading the privilege tables will ensure that all changes made so far
will take effect immediately.
Reload privilege tables now? [Y/n] //是否重新加载权限表,直接回车
… Success!
Cleaning up…
All done! If you've completed all of the above steps, your MySQL
installation should now be secure.
Thanks for using MySQL!内容版权声明:除非注明,否则皆为本站原创文章。
转载注明出处:https://sulao.cn/post/1030
相关阅读
- ubuntu部署k8s无VIP多Master部署方案
- ubuntu系统启动卡很久is-system-running显示starting状态的解决方法
- ubuntu禁止内核和软件进行自动更新
- ubuntu24.04卸载apt安装的驱动nccl和cuda库
- ubuntu22.04安装dcgm和基本用法
- ubuntu22.04安装cuda失败提示"Uninstall manifest corrupt"
- ubuntu使用ssh命令批量设置集群节点具有sudo权限的账户sudo免密切换
- ubuntu22.04算力环境基础配置一键验证脚本
- ubuntu22.04算力环境基础配置一键脚本
- ubuntu22.04忘记root密码进入单用户模式修改密码
评论列表